Assigned Vehicle Portal Instructions
Fleet Services has released a new application that will make managing assigned vehicles easier and more transparent. The Assigned Vehicle Portal (AVP) allows you to electronically perform the annual rate acknowledgement, MFK verification and vehicle contact updates.
Administrative Contacts will be able to update MFKs, and contacts at any time, at their convenience. Finally, assigned vehicle information can be downloaded into a spreadsheet so customers can create their own reports.
Fleet Services has also created new roles that allow the Administrative Contacts to assign roles to others in their organization to allow others to view, update and change vehicle information based on the permissions granted by the vehicle’s Administrative Contact.
Searching and filtering information
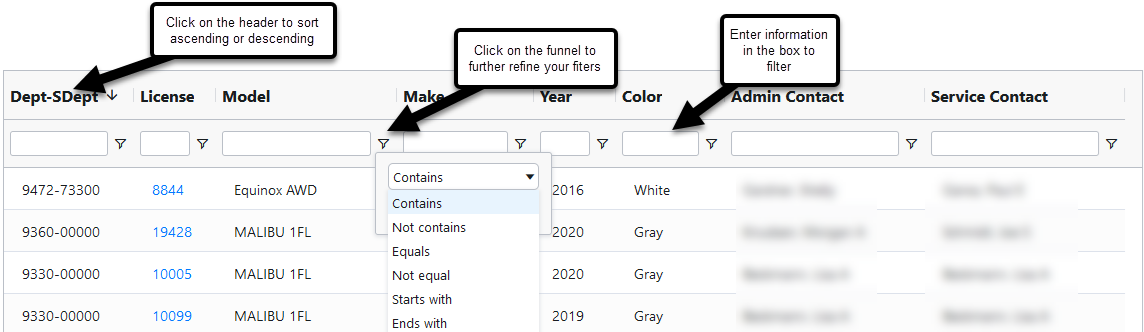
Most screens in the AVP that list vehicles, contact or rates will have a header bar that has some tools to help you refine your search.
You can click on the header and sort. The first click will sort in ascending order the second click will sort in descending order.
- Under the header name is a box. You enter words or numbers appropriate for the field to filter your results. You can enter partial information or the exact information you are looking for.
- Notice next to the box, is an icon that looks like a funnel. You can refine your search using “contains”, “starts with”, “ends with” and several others.
- Under the header name is a box. You enter words or numbers appropriate for the field to filter your results. You can enter partial information or the exact information you are looking for.
You can use the boxes to create multiple filter sorts. For example, you can enter a year in the year box, (2019) and a make in the make box, (Ford). The system will look for all 2019 vehicles and then all Ford vehicles. So, the only vehicles left in the results box would be 2019 Fords.
System roles
Administrative Contact
This is the person Fleet Services contacts regarding financial, driver complaint and vehicle replacement issues.
- This person can change and update MFKs, and Administrative/Service Contacts
- This person can add, delete, and change Administrative Contact Delegates, and Department Viewers
How to change an Administrative Contact
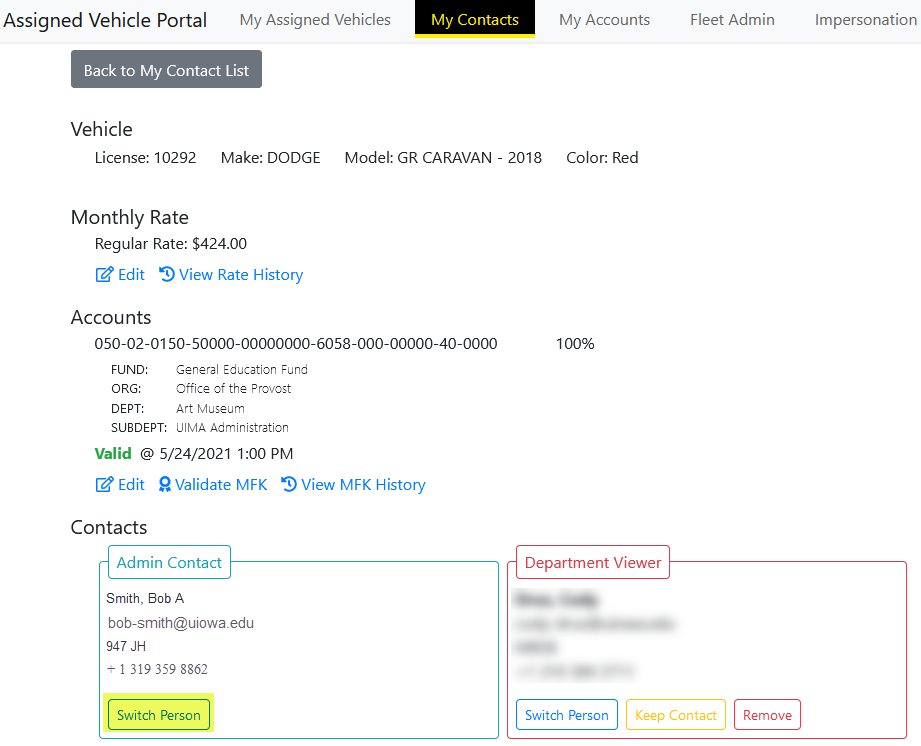
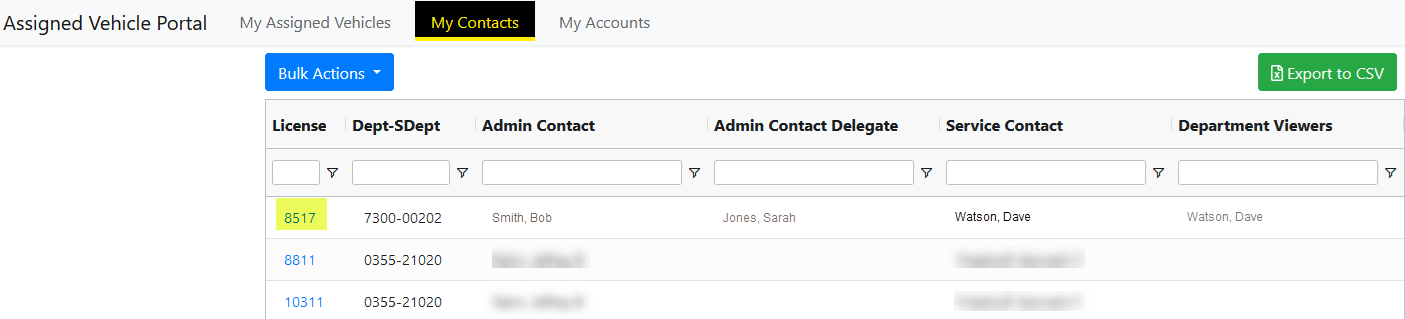
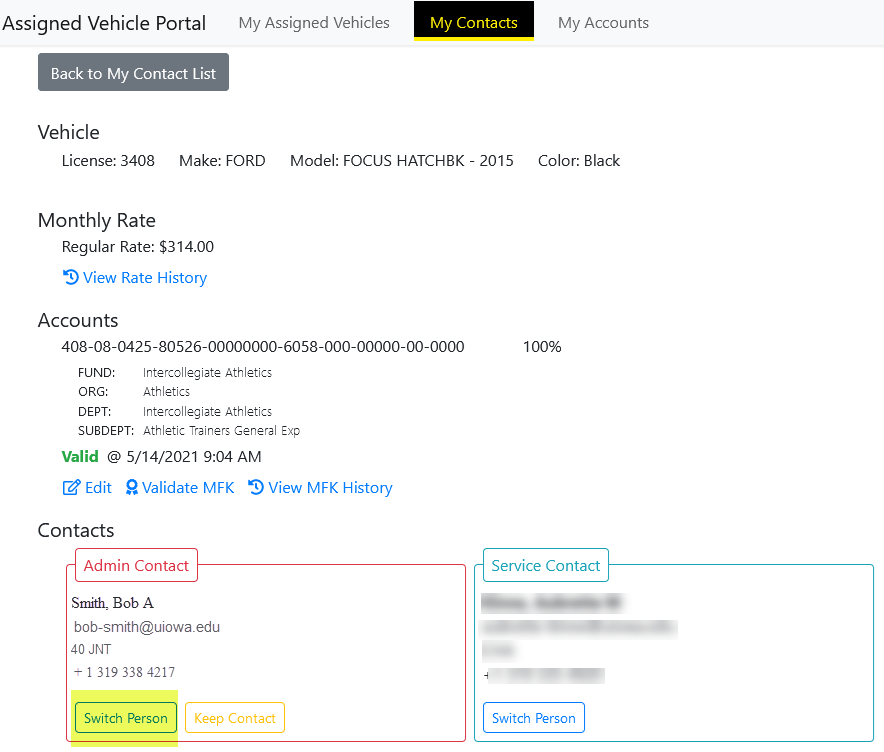
Note that the Administrative Contact cannot be deleted, only changed. To change an Administrative Contact, you must be the Administrative Contact. The first step is to log in to the Assigned Vehicle Portal and click the “My Contacts” tab at the top of the page.

Click on the link of the license number (highlighted in yellow above) of the vehicle you would like to update the Administrative Contact. The vehicle information page will open showing the current contact information. Click on the “Switch Person” button, highlighted in yellow below.
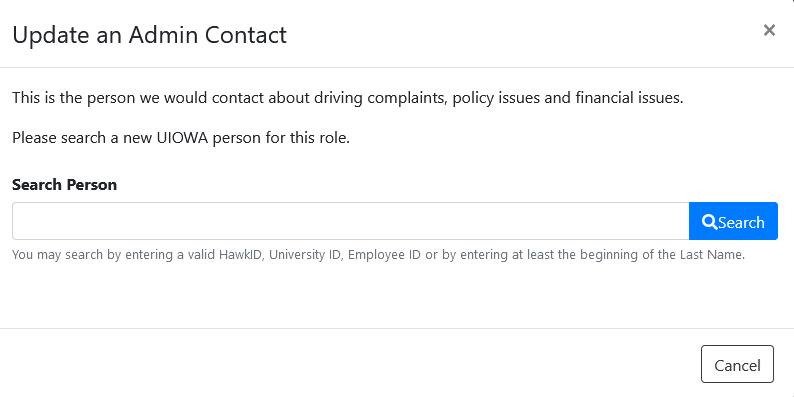
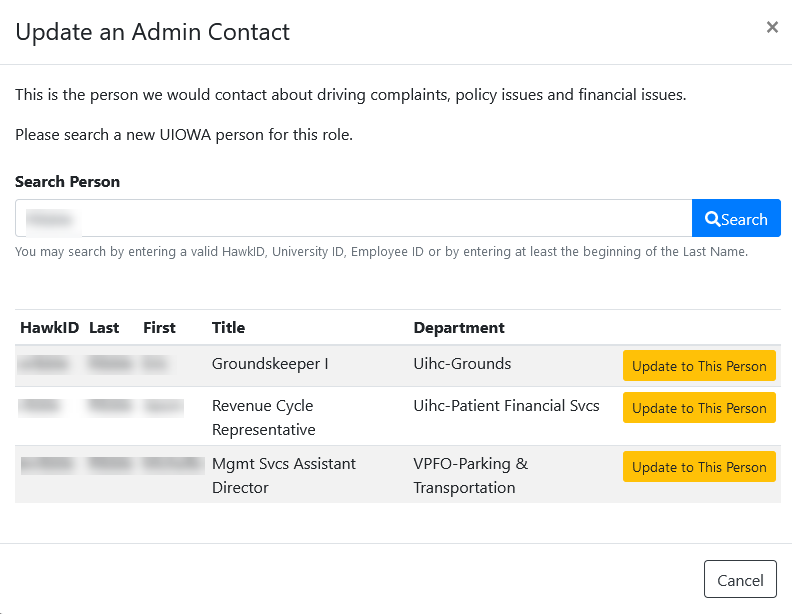
The search window will open allowing a search by HawkID, University ID, Employee ID or last name.
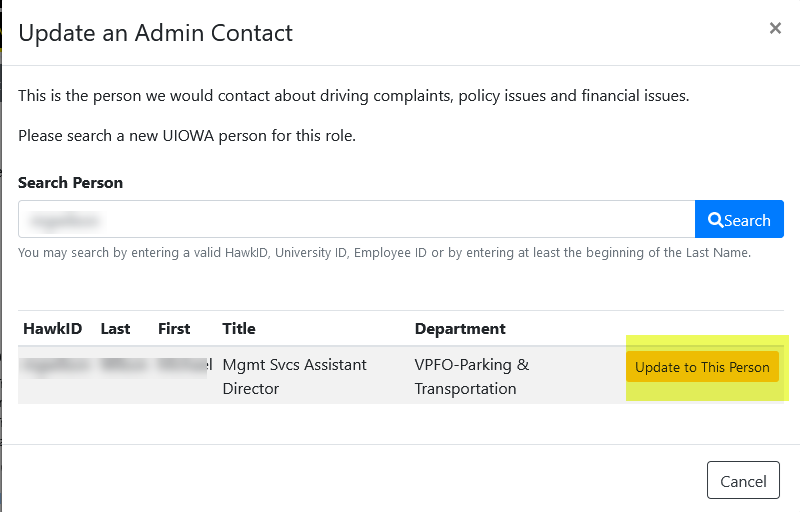
In the search results, select the new Administrative Contact by clicking on the “Update to this Person” button highlighted in yellow below.
Administrative Contact Delegate
This role is designated by the Administrative Contact and has the same rights as the Administrative Contact except that this person cannot change the Administrative Contact.
How to add, change or delete an Administrative Contact Delegate
To add, change or delete an Administrative Contact Delegate you must be an Administrative Contact.
To add, change or delete an Administrative Contact Delegate, the first step is to log in to the Assigned Vehicle Portal and click the “My Assigned Vehicles” tab at the top of the page.

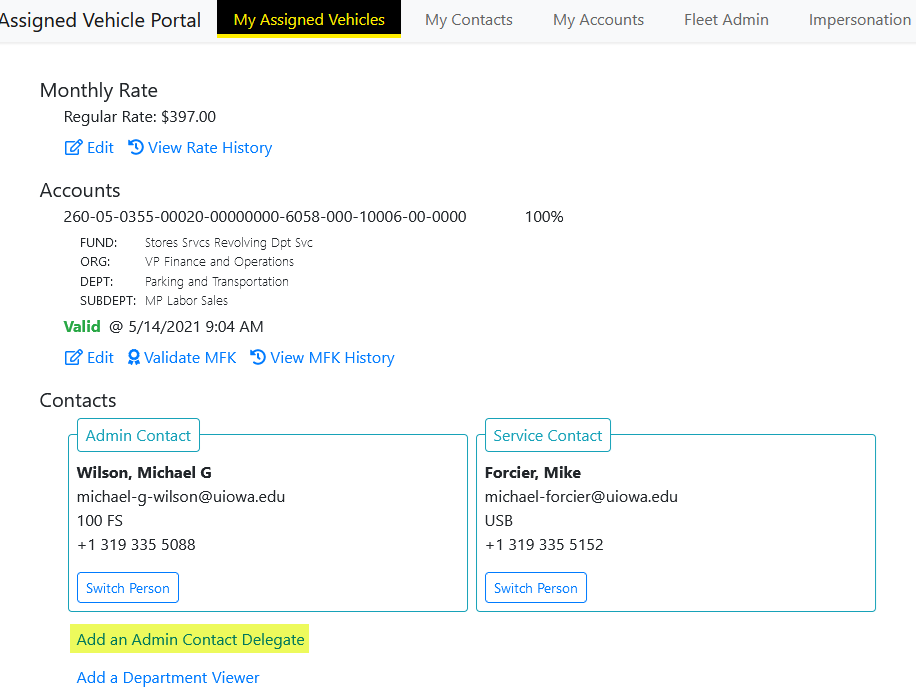
Click on the link of the license number (highlighted in yellow above) of the vehicle you would like to update the Administrative Contact Delegate. The vehicle information page will open showing the current contact information. To add an Administrative Contact delegate, click on the “Add an Admin Contact Delegate” link, highlighted in yellow below.
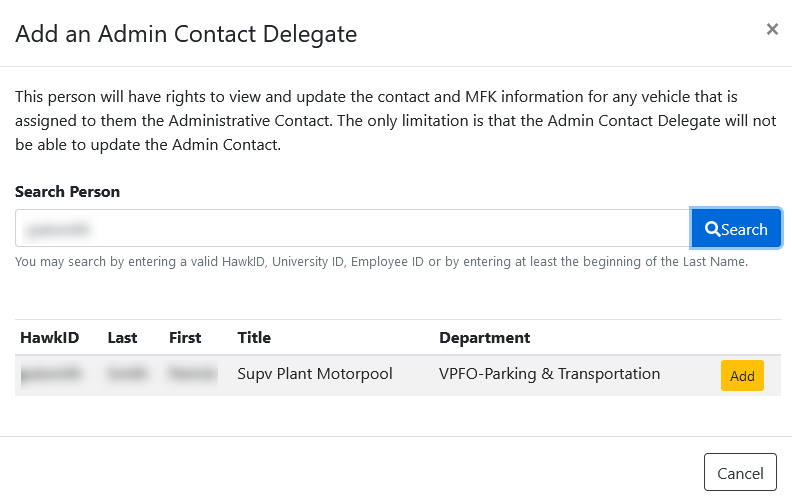
The search window will open allowing a search by HawkID, University ID, Employee ID or last name. In the results window click on the yellow “Add” button next to the correct person. This person has now been added an Administrative Contact Delegate.
To change to a different Administrative Contact Delegate the first step is to log in to the Assigned Vehicle Portal and click the “My Assigned Vehicles” tab at the top of the page.
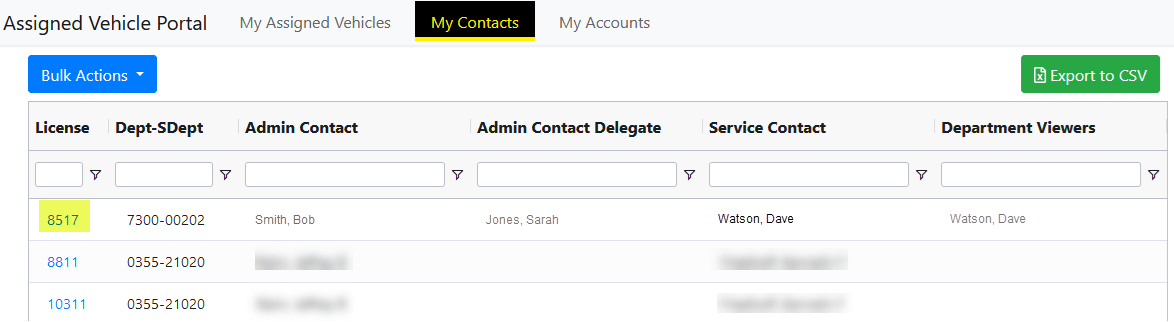
Click on the link of the license number (highlighted in yellow above) of the vehicle you would like to change the Administrative Contact Delegate. The vehicle information page will open showing the current contact information. Click on the “Switch Person” button, highlighted in yellow, to open the search window.

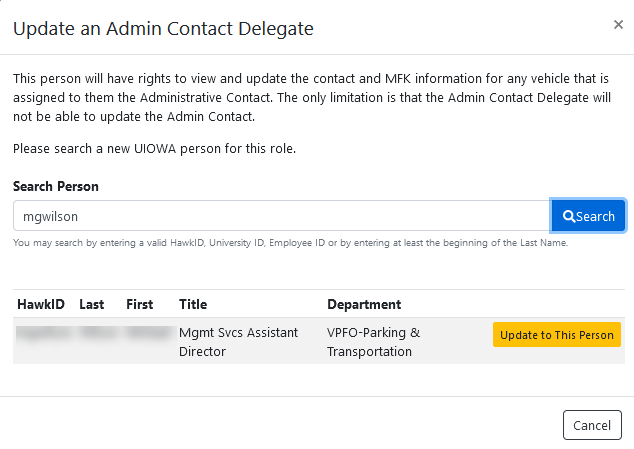
You will be able to search by HawkID, University ID, Employee ID or last name. In the results window click on the yellow “Add” to switch this person to the Administrative Contact Delegate.
To remove an Administrative Contact Delegate, click on the “Remove” button highlighted in green above.
Service Contact
The service contact is the person we would contact for maintenance and repair issues, recalls and if the vehicle needs to be moved for construction or other emergencies.
How to change a Service Contact
Note that the Service Contact cannot be deleted, only changed. To change a Service Contact, you must be the Administrative Contact or the Administrative Contact Delegate. The first step is to log in to the Assigned Vehicle Portal and click the “My Contacts” tab at the top of the page.

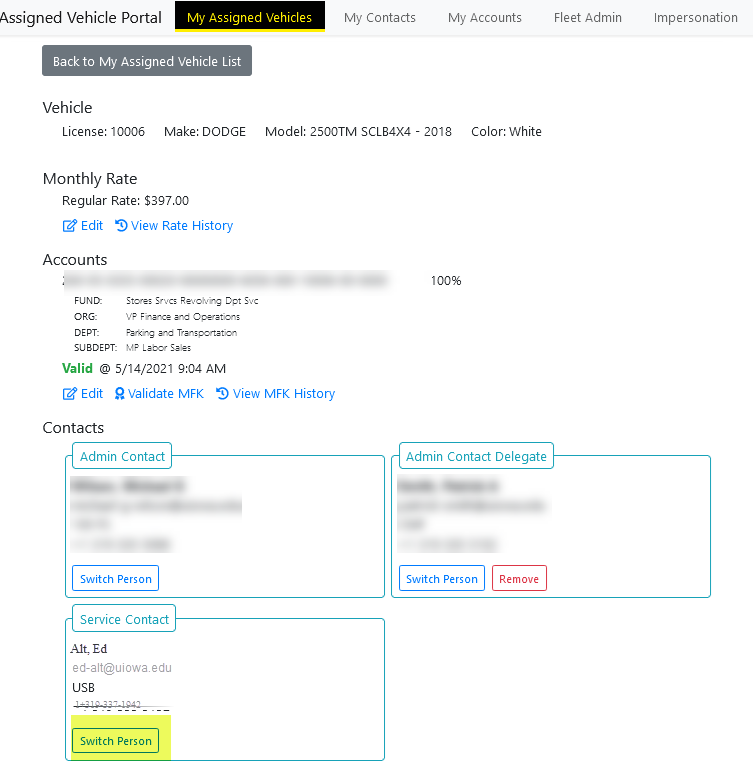
Click on the link of the license number (highlighted in yellow above) of the vehicle you would like to update the Service Contact. The vehicle information page will open showing the current contact information. Click on the “Switch Person” button, highlighted in yellow below to open the search window.
You will be able to search by HawkID, University ID, Employee ID or last name.
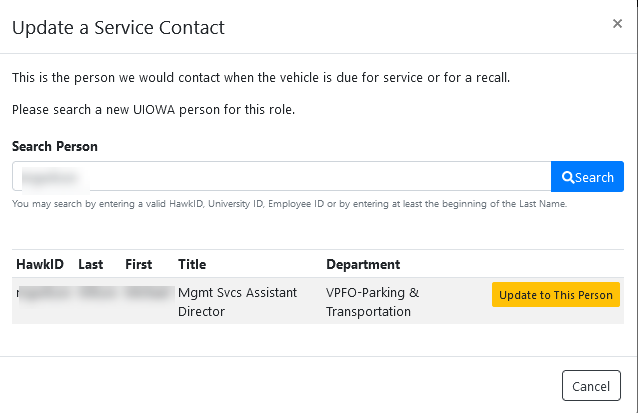
In the results window click on the yellow “Update to This Person” to switch this person to the Service Contact
Department Viewer
The Department Viewer is a new role with the introduction of the Assigned Vehicle Portal. An Administrative Contact or Administrative Contact Delegate can assign a Department Viewer to one or many vehicles.
Note that each vehicle can have only two Departmental Viewers. The Departmental Viewer can view and download information regarding assigned vehicles but cannot change any information.
How to add, change or delete a Department Viewer
To add, change or delete a Department Viewer you must be an Administrative Contact or an Administrative Contact Delegate.
To add a Department Viewer, the first step is to log in to the Assigned Vehicle Portal and click the “My Contacts” tab at the top of the page.

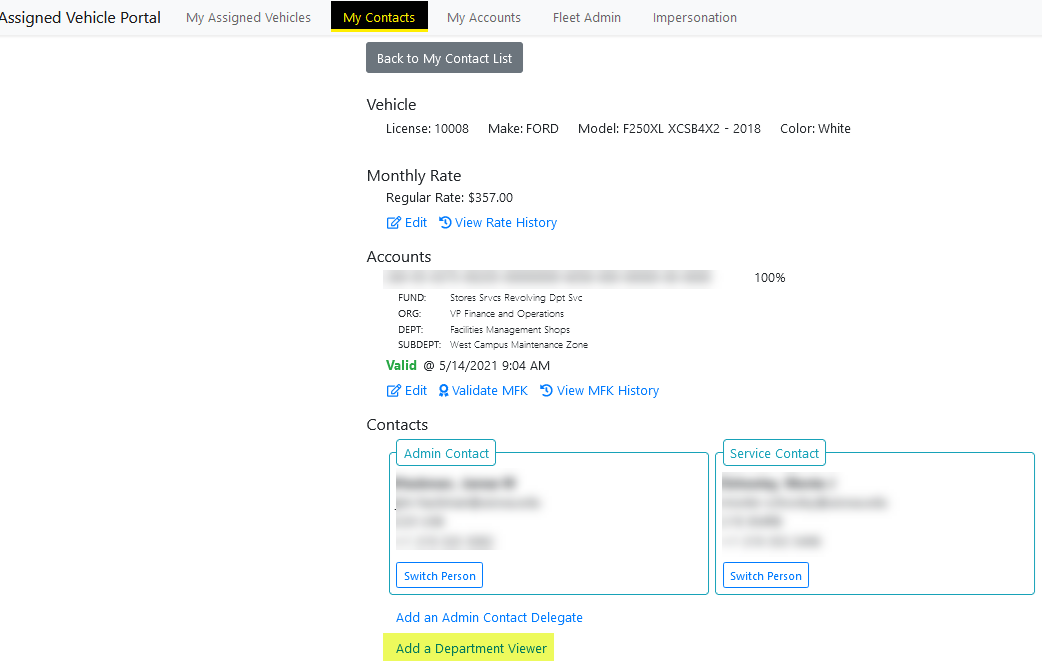
Click on the link of the license number (highlighted in yellow above) of the vehicle you would like to add a Department Viewer. The vehicle information page will open showing the current contact information. To add a Department Viewer, click on the “Add a Department Viewer” link, highlighted in yellow(below).
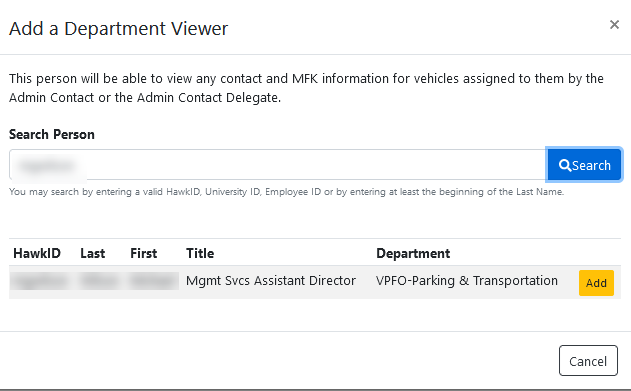
The search window will open allowing a search by HawkID, University ID, Employee ID or last name. In the results window click on the yellow “Add” button next to the correct person. This person has now been added a Department Viewer.
To change to a different Department Viewer first step is to log in to the Assigned Vehicle Portal and click the “My Assigned Vehicles” tab at the top of the page.
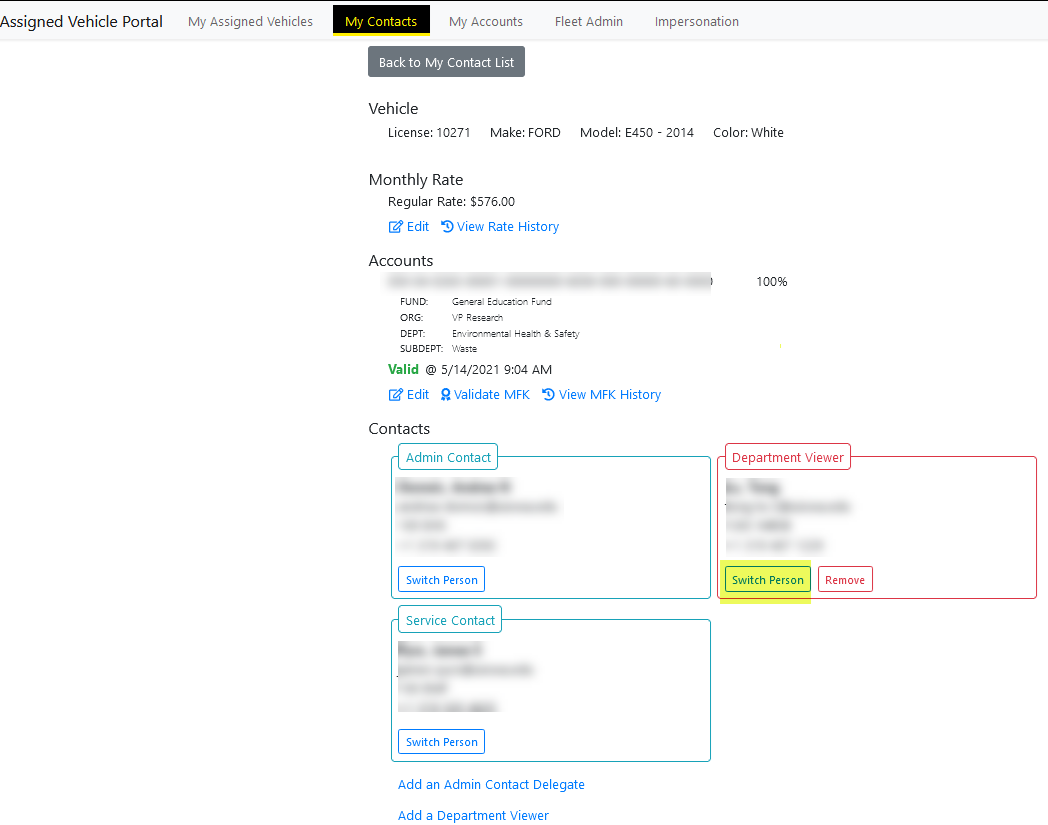
Click on the link of the license number (highlighted in yellow above) of the vehicle you would like to change the Department Viewer. The vehicle information page will open showing the current contact information. Click on the “Switch Person” button, highlighted in yellow, to open the search window.
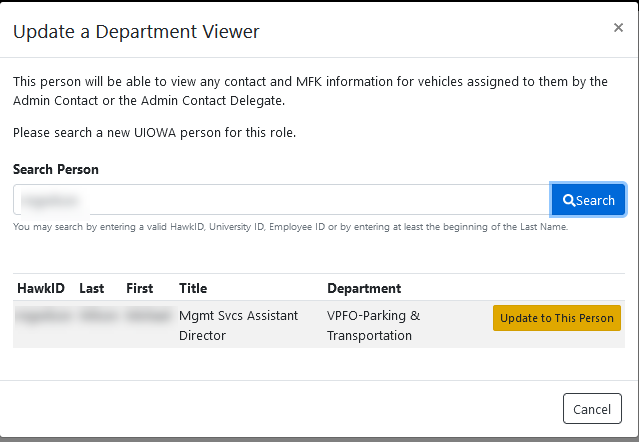
You will be able to search by HawkID, University ID, Employee ID or last name. In the results window click on the yellow “Update to This Person” to switch this person to the Department Viewer.
To delete a Department Viewer, click on the red “Remove” button” located on the vehicle information page.
System emails and banner notifications
You may receive reminders for the listed emails that will look very similar to the original email.
New vehicle rates available for upcoming fiscal year
When you get this message, it means that the rates for the new fiscal year are available for your vehicle. Click on the link to be directed to the Assigned Vehicle Portal. After you log in, you should see a banner like the one below.
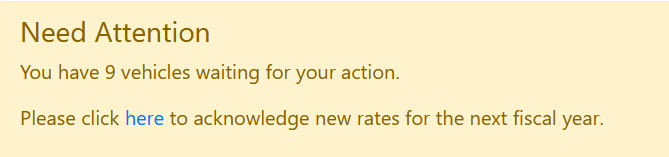
Click the link to be taken to a listing of your vehicles (sample below) that need the new rate acknowledged. You may have an option for a loaner vehicle, so click the radio button next to the rate that makes the most sense for you.
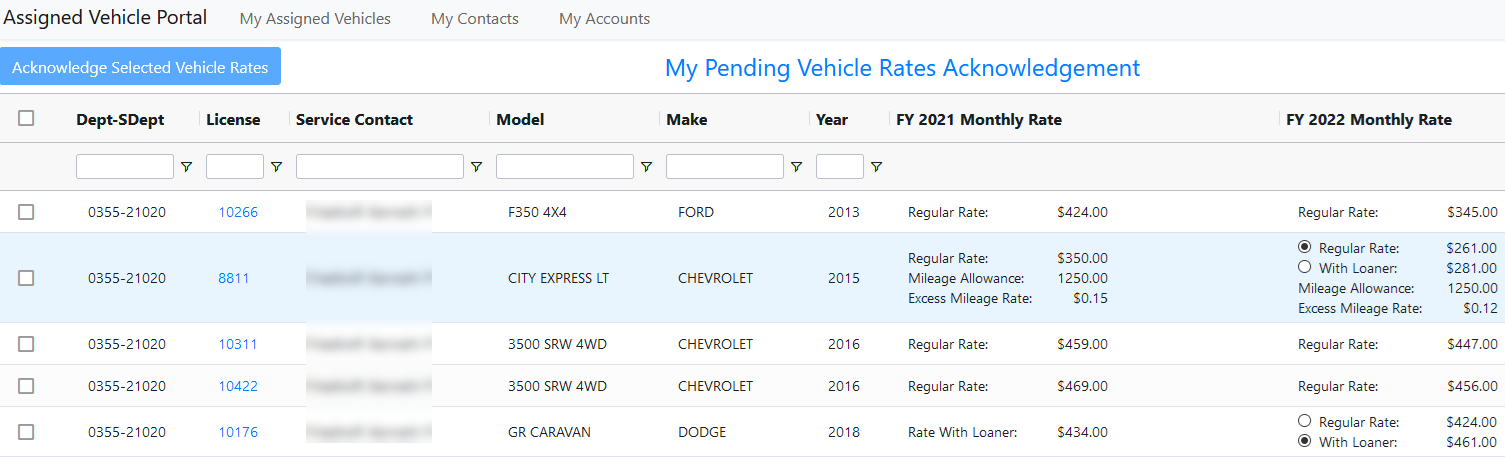
Once correct rate has been chosen (by selecting the corresponding radio button) either click the box to on the left to select individual vehicles or the box on at the top left to select all of the vehicles and then click on the “Acknowledge Selected Vehicle Rate".

Confirm your selections by clicking on the “Yes I acknowledge the new rates” button.
Acknowledgement of vehicle contacts and MFK for new fiscal year
When you get this message, it means that the system needs you to review the MFK and contact information currently in the system to make sure they are correct. Click on the link to be directed to the Assigned Vehicle Portal. After you log in, you should see a banner like the one below:
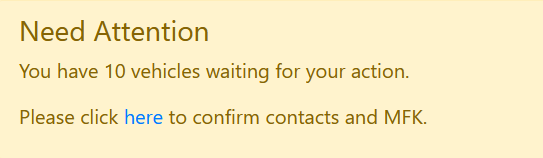
Click the link to be taken to a listing of your vehicles (sample below) that need the MFK and contact information acknowledged.
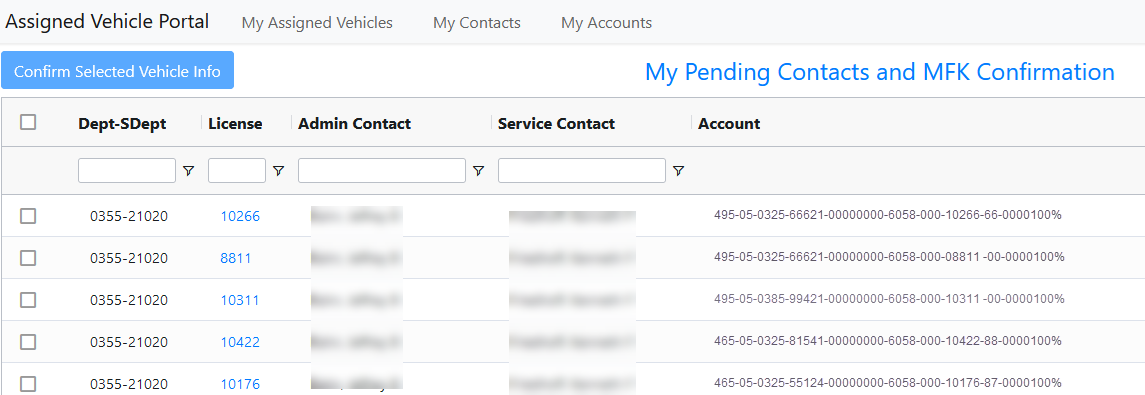
If you need to make a change, click on vehicles license number and you will be taken to the page below to make any necessary edits.
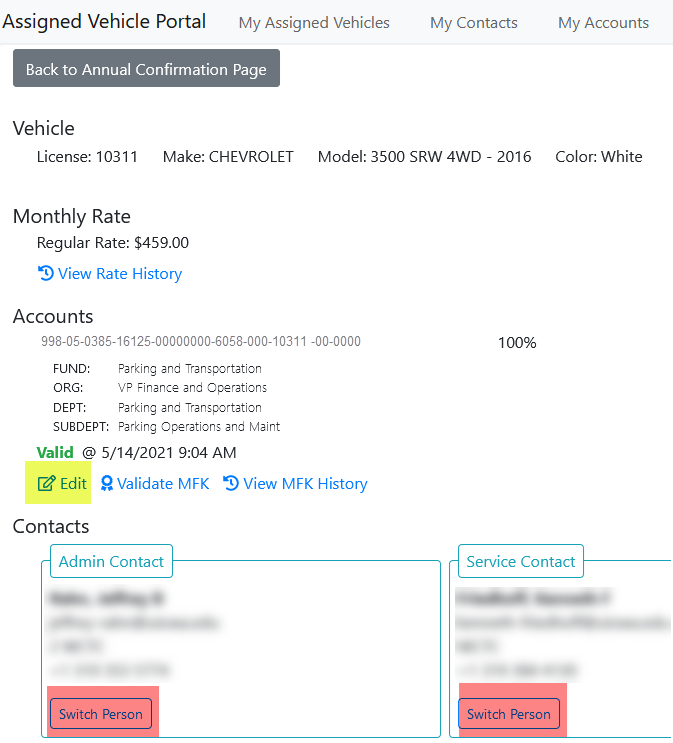
To edit the MFK, click on the edit link highlighted in yellow. Enter the new MFK information, then click the validate and save button. The system will not allow you to enter an MFK that is not valid.
To edit a vehicle contact, click on the appropriate “Switch Person” button highlighted in red. You will be presented with a search screen to find the new contact. Enter the person’s last name, HawkID, University ID or employee id then select the correct person and click on the “Update to This Person” button.
MFK needs updated
When you get this message, it means that an MFK in the system for one or more of your vehicles is invalid. Click on the link in the email to be directed to the Assigned Vehicle Portal. After you log in, click on the tab at the top that says, “My Accounts”. In the far-right column, you will see an “N”, highlighted in red for those vehicles that have an invalid MFK

To update to a valid MFK, click on the license plate number for the corresponding vehicle, highlighted in yellow above. This will open the vehicle information page and allow you to edit the MFK. See below.
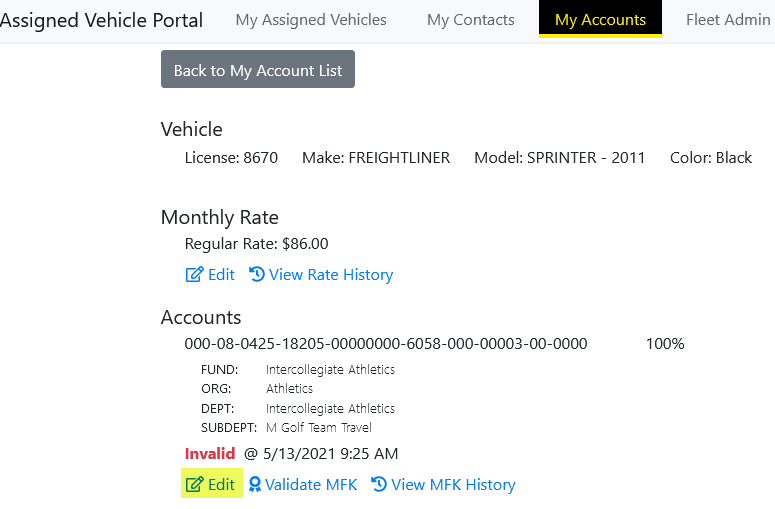
Click on the “edit” link, highlighted in yellow, to edit the MFK. Make the appropriate corrections, and then click on the “Validate and Save” link. The system will not allow you to save an invalid MFK.
Vehicle contact information update needed
When you get this message, it means that a contact for one or more of your vehicles is no longer valid. The person may have left the University or the person may have transferred to a different department. To fix this error, click on the link in the email to be directed to the Assigned Vehicle Portal.
After you have logged in, you will see the banner below on the home page

Click on the blue license plate number to open the vehicle information page.
When the page opens, click on the “Switch Person” link for the appropriate person you need to switch. In this case we have highlighted, in yellow, the “Switch Person” link for the Administrative Contact.
After clicking on that link, a search window opens to search for a new contact based on the persons HawkID, University ID, Employee ID, or the person’s last name. After searching, select the appropriate person by clicking on the “Update to This Person” button.
Bulk Contact Actions
Sometimes, an Administrative Contact or Delegate may want to make the same contact change to many vehicles. For example, when initially setting up the Assigned Vehicle Portal an Administrative Contact Delegate may need to be assigned for all vehicles, or a person may have left the organization who was the Service Contact for multiple vehicles, and a new Service Contact needs to be assigned for those vehicles. The Assigned Vehicle Portal allows these “Bulk” changes through the Bulk Actions feature.
In this case the system may be asking for an update to vehicles contacts because something caused the system to believe the contact is no longer valid. This may be because the department updated its department number, or the contact changed positions. This feature allows customers to tell the system that even though a change occurred, the contact stays the same.
How do I add the same contact to multiple vehicles?
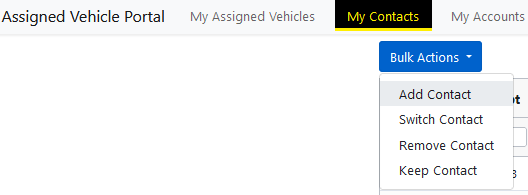
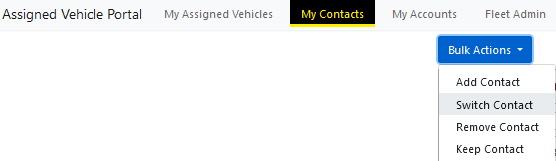
One the Assigned Vehicle Portal has been opened, click on the “My Contacts” tab at the top of the page. When the page opens, click on the blue “Bulk Actions” drop-down at the top left of the page and select, “Add Contact”.
The system will then ask what role you want this new contact to be. Remember, you can only switch Administrative and Service Contacts, you cannot add or delete them.

In this case, let’s say we want to add an Administrative Services Contact Delegate. When you make either choice, a search button will pop-up to help you find the person you want to designate.
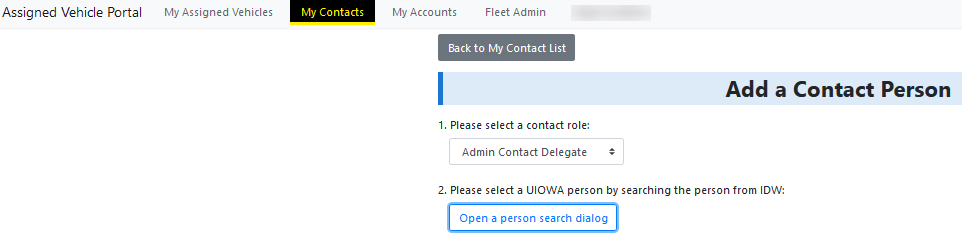
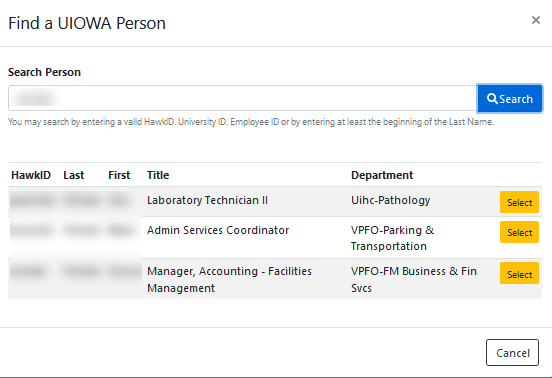
When you click on the “Open a person search dialog” button, a search box opens allowing you to search by HawkID, University ID, Employee ID, or last name.
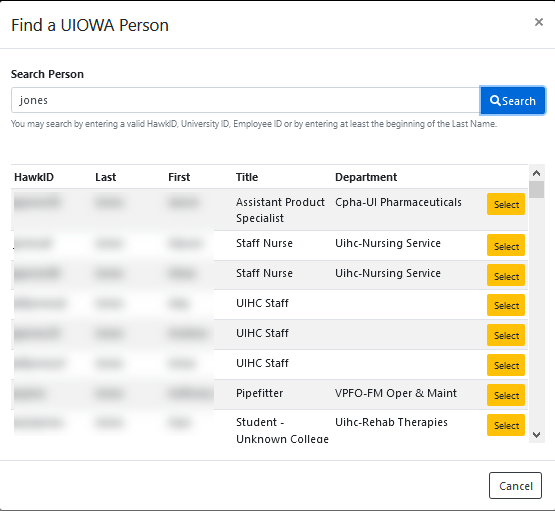
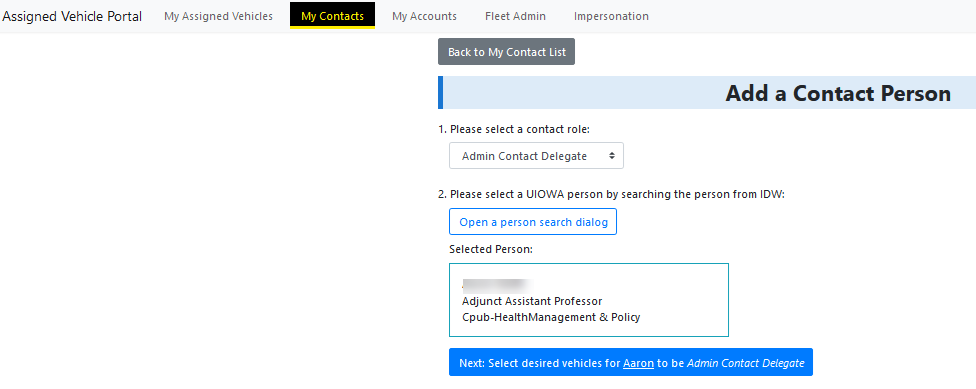
Click on the yellow select button on the same line as the person you want to select.
Then you will be asked which vehicles you wish to assign the new contact to. Click on the blue, ”Next: Select the desired vehicles for name to be Admin Contact Delegate” button.
You will then see a list of all vehicles for which you can add contacts for. You can select all vehicles by checking the box to the left of the “Dept-SubDept” header, highlighted in yellow, or you can select individual vehicles by checking the box next to the specific vehicle, highlighted in green below.
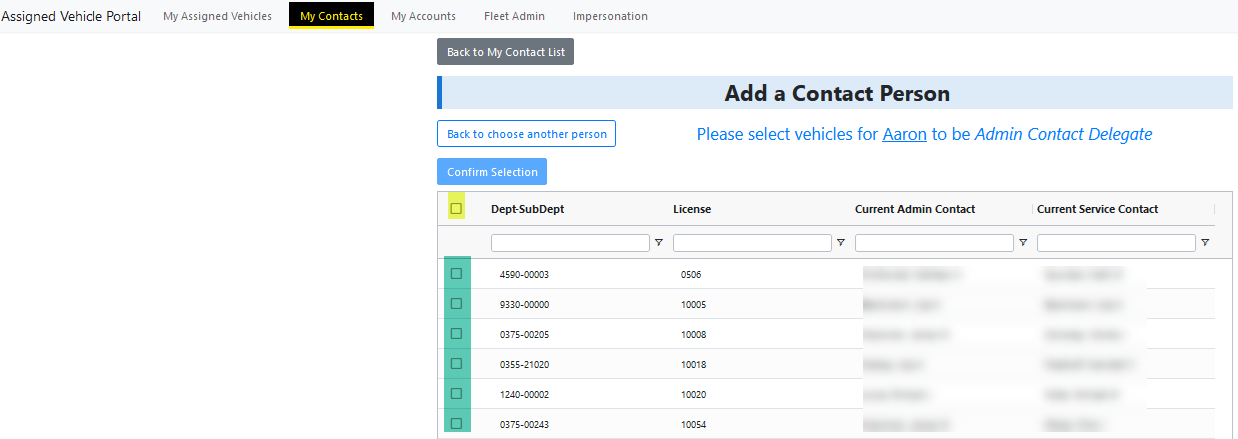
Once you have made the appropriate selection, click the blue, “Confirm Selection” button above.
You will be asked to confirm the selection:
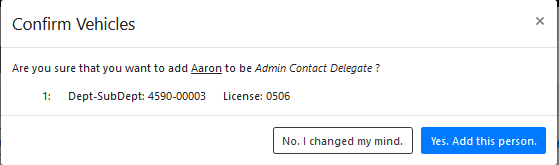
Clicking the , “Yes, Add this person” button will the new Administrative Contact Delegate to the vehicles that were selected earlier.
How do I switch the contact on multiple vehicles?
Once the Assigned Vehicle Portal has been opened, click on the “My Contacts” tab at the top of the page. When the page opens, click on the blue “Bulk Actions” drop-down at the top left of the page and select, “Switch Contact”.
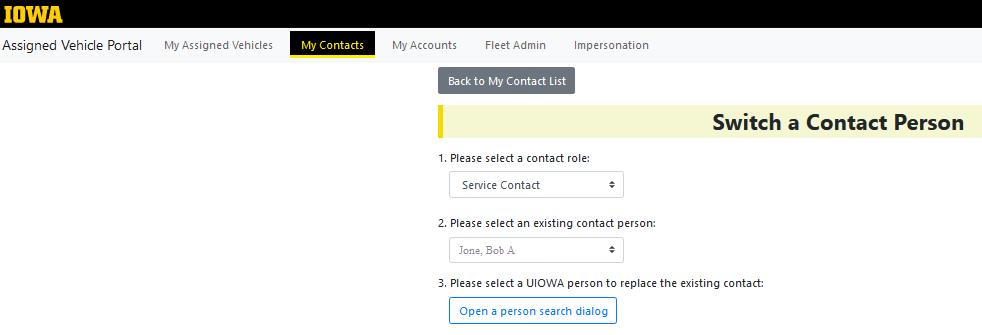
You will then be asked to choose the role you want to switch.

The choices you are provided depend on your role.
- If you are an Administrative Contact, you can switch any role.
- If you are an Administrative Contact Delegate, you can switch the Service Contact and the Department Viewer.
- If you are the Service Contact, you can switch the Service Contact.
The steps below are the same no matter what role you want to switch.
After you choose the role that you want to switch, then you will be asked to choose the person in that role that you want to switch from. You can then click on the “Open a person search dialog” button to search for the person you want to move the to.
As in other search boxes in the application, you will be able to search for the new person by HawkID, University ID, Employee ID or last name. Click the yellow, “Select” button next to the person you want as the new contact.
Then you will be asked to choose the vehicles that you want to make this switch effective for. Click on the blue button below

You can choose all vehicles by selecting the box highlighted in yellow below, or specific vehicles by checking any of the boxes highlighted in green below.

Once you have made your selection, you confirm it by clicking the blue, “Confirm Selection” button above.
When the Confirm Vehicles dialog box opens, you can choose “Yes, Switch Contact” to make the change or “No, I changed my mind” but to return to the previous page.
How do I remove the contact on multiple vehicles?
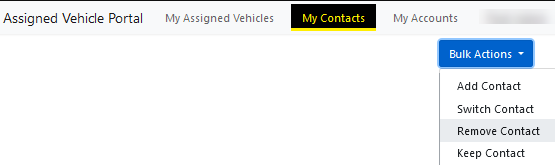
Once the Assigned Vehicle Portal has been opened, click on the “My Contacts” tab at the top of the page. When the page opens, click on the blue “Bulk Actions” drop-down at the top left of the page and select, “Remove Contact”.
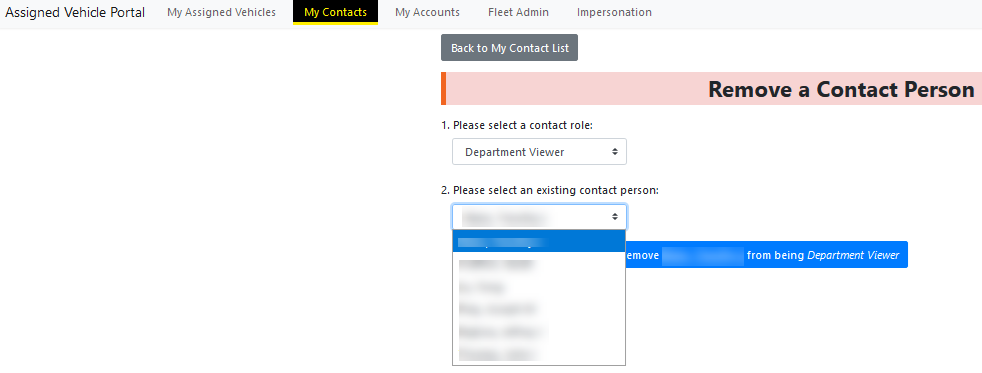
You will then be asked what role the person has that you want to remove. Keep in mind, the only roles that can be removed are the Admin Contact Delegate (Can only be removed by the Admin Contact) and the Department Viewer (Can be removed by the Admin Contact and the Admin Contact Delegate).

Select the role of the person you want to remove . You will be presented with a drop down of all people who hold that role for vehicles that you have access to change. That may be only one person, or it may be many people. Click the blue box below the person’s name that you have selected.
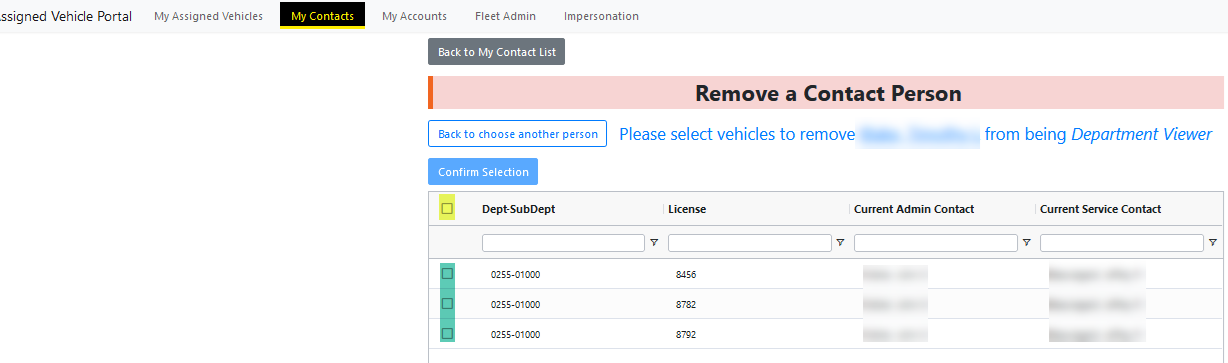
Then you will be presented with a list of vehicles where that person has the role you would like to remove. Select the box highlighted in yellow to select all vehicles or check the box next to the individual vehicles, highlighted in green, you would like that person removed from. Then click on the blue, “Confirm Selection” button above the search box header.
A confirmation box will pop-up. Select either “Yes, Remove this contact” to finalize the removal or “No, I changed my mind” to be taken back to the previous page.
How do I keep the same contact on multiple vehicles?
When you log in to the Assigned Vehicle Portal you may see a banner similar the example below:

In the example above one vehicle may have out-of-date contact information. The system logic may determine that the person is no longer in the department and not available to be a contact. There are circumstances where the system can be incorrect. To over-ride the system logic and keep the same person as a contact follow these steps.
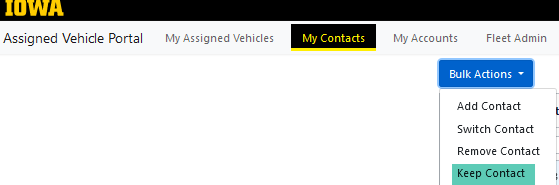
Click on the “My Contacts” tab at the top of the page and then click on blue, “Bulk Actions” drop-down and choose “Keep Contact”.
You will then see a drop-down of the roles for to select to retain.
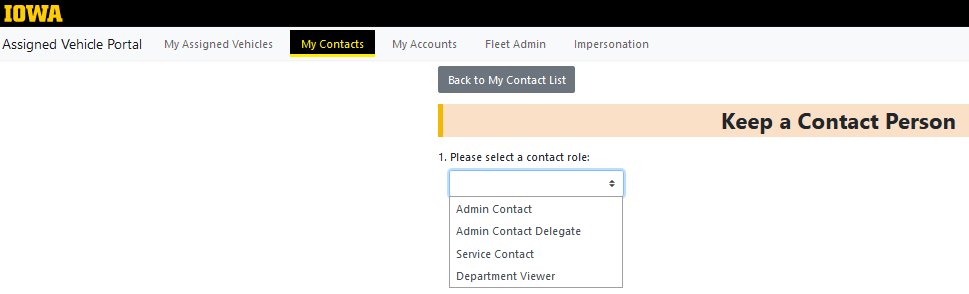
When you select a role, you will be presented with a drop down of those staff that are in that role that the system has determined are no longer available for that role.

Use the drop-down to select the person you would like to retain in the role and click the blue button.
Then you will see a list of vehicles for which that person has the role you want them to retain.
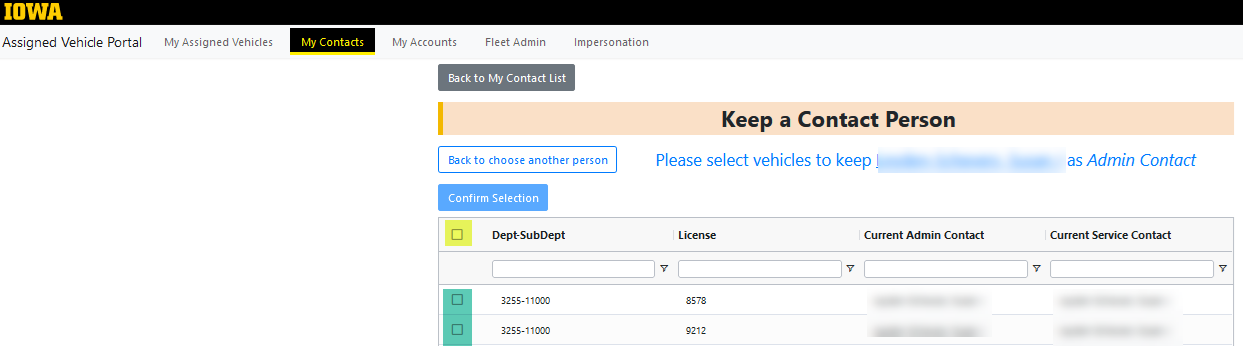
Select the box highlighted in yellow to select all vehicles you want the person to remain in the role for or select any of the green highlighted boxes to select individual vehicles where you want the person to retain the role.
Once you have made your selection, you will see the Confirmation box below.

Chose the “No, I changed my mind.” button to go back to the previous page or the “Yes. Keep this contact.” to over-ride the system and keep the current contact.